Electricity in a camper van is extremely useful (and to be fair, outside of a camper van as well). In my van, I use is to power the lights, diesel heater, water pump, wifi access point, sound system, microwave, kettle, and the roof vent (and even all at once, if for whatever reason I ever find the need to).
The internet is full of a lot of valuable blog posts about people’s various takes on designing their battery and solar systems, each having a different set of priorities and constraints. For me, being able to power all of the above without having to be extra conservative with energy usage as well as being able to leverage solar energy were the key requirements. Additionally, I wanted to be able to monitor the system remotely. The setup I ended with is a 5kWh custom LiFePo4 battery pack, monitored and charged using an ElectoDacus SBMS40, and an array of 600W of solar panels.


The Battery
I knew from the beginning that I wanted a LiFePo4 battery. Lead acid batteries are much heavier and larger, and since this is an object that would live permanently in the van, I preferred to spend more money for a much superior chemistry. The battery I built uses 16 CALB CA100FI cells, in a 2 parallel 8 series configuration. This gives me a 200Ah 25.6V battery, or 5.1kWh – plenty to meet my requirements. The reason I went with a custom battery was cost – I paid around $2000 for the cells. This is half the price compared to, for example 4x BattleBorn 100Ah 12V batteries (at ~$1k each). I started with only 8 cells, and as my need for more usable energy increased (with the addition of an inverter for running a microwave and kettle), I purchased 8 more and doubled my capacity.
I opted for an 8 cell (25.6V) setup instead of the standard 12V because these days many things can be powered by 24V. This cuts the wire size in half, and knowing I am interested in consuming over 1500W from my inverter, this is the difference between having to move around ~60A or over 100A. I was able to power my 3kW inverter (and another 100Wish one), fridge and water pump natively from the ~25.6V supplied by the battery. For appliances requiring 12V, where a 24V alternative was not available, I got a 24V to 12V DC-DC converter of sufficient capacity.
The initial 8 cell battery lived inside a milk crate:

Once I moved up to 16 cells, I welded a custom-made enclosure to house the 16 cells, and allow me to mount an inverter and 120V charger on top of it (both live under the bed).
The first order of business, upon receiving the cells, was to make sure they all share the same state of charge. For that purpose, I discharged my existing 8 cell pack and the new 8 cells to around 2.7V, which for LiFePo4 is close to empty, and connected all cells in parallel to equalize for 24 hours:
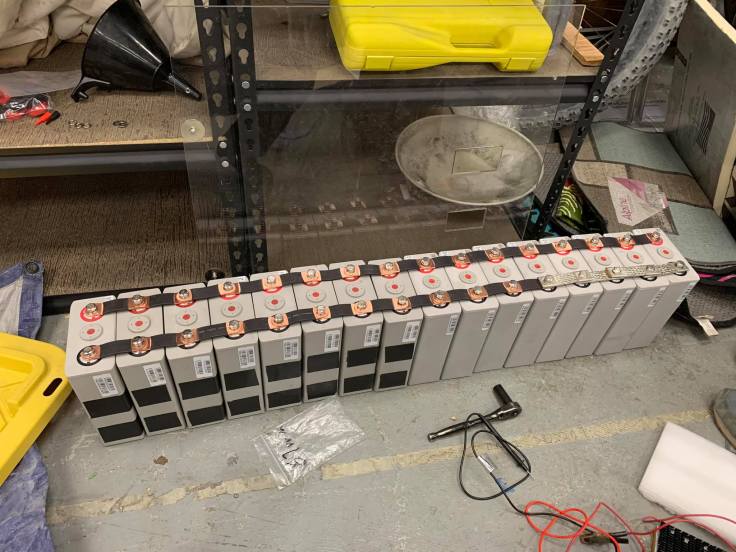
I also built an enclosure to house all of the cells:


Once the enclosure was ready, I mounted it in the van, together with the inverter/external charger and relays (more on that later):


The charger and BMS
A LiFePo4 battery demands a battery monitoring system (BMS) to monitor each of the individual cells and ensure they do not get over-charged or under-discharged. Ideally, I wanted a BMS that is integrated with a solar charger, to reduce wiring, complexity and potential failures arising from those. I also wanted a BMS that allows me to keep track of consumption, and have a way to make that available over the internet connection provided by a permanently-installed phone. At the time (and even two years later), very few products on the market are available to address this need. There are plenty of solar chargers, and plenty of BMSs, but very very few ones that combine both functionalities. The ElectroDacus SBMS40 is an integrated solar charger + BMS, that supports all the functionality I need. It allows for up to 1kW of solar panels, monitoring and active balancing of up to 8 cells, remote monitoring via either a builtin WiFi access point or via serial port, direct load connection of up to 1kW, support for external load and charger, and a nice LCD display. It is also extremely affordable (if you managed to get on the Kickstarter), and even open source. Ideal!
I’ve had it for close to two years at this point, and it continues to work flawlessly.
The SBMS40 is seen here, together with a bunch of electronics:

Charging from solar
Solar power is a great luxury – being able to get free energy when camped for a few days is a pretty magical thing to have. I opted to fill my roof space with solar panels – conveniently, I was able to fit six 100W Renogy RNG-100D panels in a 2 series 3 parallel configuration, which is compatible with what the SBMS expects for an 8 cell setup. I do wish I had more roof space for more panels – in a future version I might increase the capacity by having the panels extend sideways, but for the time being I like having the array be slick-looking.

Charging from 120V
For times when solar fails to meet my energy demands, for when preparing to go to a festival and wanting to ensure I arrive with a fully charged battery, I wanted to be able to use 120V wall power to supplement the solar array. For that, I needed a power supply that is able to operate in constant current mode (or, to phrase differently, a current-limited power supply). Such a power supply is able to charge the battery directly. For protection, is is connected via a relay controlled by the SBMS such that the SBMS is able to disconnect it from the battery once it is fully charged. I went with a MeanWell RSP-500-27 and a generic automotive-grade relay. The charger, and the 3kW inverter, can be seen here:

Remote monitoring
Remote monitoring is achieved by a combination of software and hardware components in the van, and a Linux machine in the cloud. The core is a Raspberry Pi3 board, that is connected to the SBMS40 via a USB-to-serial adapter and to the internet via a GL.iNet GL-AR750 router (that is in turn connected to a Nexus 6 phone that lives in the van). I initially had the Raspberry Pi connect to the SBMS via WiFi, but that proved to be unreliable.
The Pi uses sbms_exporter, a tool written by an ElectroDacus user, that periodically grabs all the data the SBMS exports via serial port, and exposes it as a Prometheus exporter. On a cloud machine, I am running Prometheus to collect the data, and Grafana to visualize it. Technically I could’ve ran those directly on the RPi.
Additionally, the Pi runs autossh in order to maintain an SSH connection to the cloud machine. SSH port forwarding is then used to both allow the cloud machine to connect to the prometheus exporter, as well as allowing me to SSH into the Pi from the cloud machine.
It took a few attempts to get the SSH setup to work reliably, but in the end this is the autossh command I ended up with. It forwards port 6681 and 22, and exposes them on the cloud machine:
/usr/bin/autossh -M 13222 -o "ExitOnForwardFailure=yes" -o "ServerAliveInterval 30" -o "ServerAliveCountMax 3" -R :2222:localhost:22 -R 0.0.0.0:6681:localhost:6681 van@xxxx -i /home/eran/.ssh/id_rsa -N > /tmp/autossh 2&1
It is set as a systemd service, so that is auto-restarts if it dies (which happens when the connection terminates).
Here’s a partial screenshot of the Grafana dashboard:
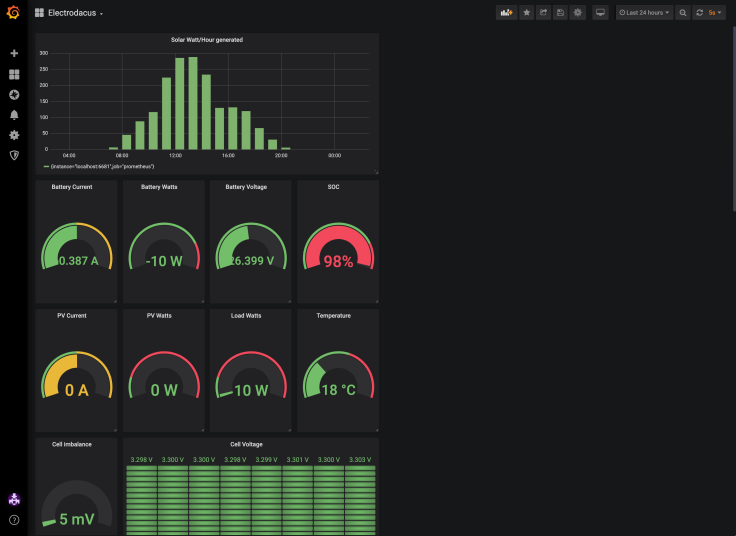
You can view the full dashboard here. The dashboard JSON file, in case you’re curios,. can be seen here.
Here’s a bonus photo of the kitchen area, with the newly mounted microwave:


Thanks for the write up.
Quite interesting, even 2 years later!
It would be great to have some price points, in order to have a global idea of the project costs.
LikeLike
Thank you!
It’s been awhile and I didn’t keep track of costs, but I think the solar panels were around $100/ea? The 100Ah CALB cells were around $150/ea I think. I believe LiFePo4 prices went down since then. The inverter was around $300 or so, and the Electrodacus BMS was also around $200?
Cables, breakers, fuses, etc added some more.
LikeLike